Workshops (page 3 of 4)

Ecoprinting with Autumn Leaves

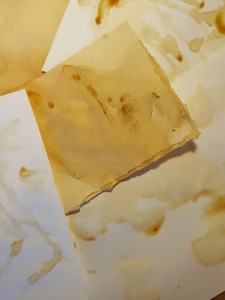
One of my favourite times of the year is autumn and one of my favourite ways to hold onto the beauty and mystery that the season holds is to make ecoprints, steaming leaves I have foraged on my hikes into paper that I then make into cards, framed prints, or book covers.

Dying with plants is an inexact science but I have been doing this one for years and here’s hoping that some of these pointers will steer you in the right direction with your attempts.

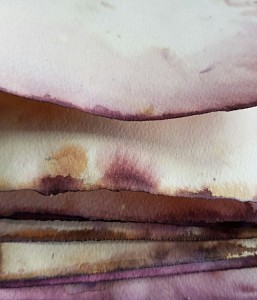
Choose a robust paper. Anything under 130 g/m is likely to tear when it is wet. I tend to use a watercolour paper that is 300 g/m. It makes for a sturdy substrate that will then be a nice weight for working into a project.

Choose your leaves! Not going to lie, this is a bit of an art, and the more batches of prints you make, the more you find from trial and error what really pops in your finished pages. I can tell you that I have the best results from leaves that had fallen from the tree – do not take them from the [read more]

What is the Best Way to Keep a Journal?


Okay, now that you’re here, I might as well tell you this is a trick. Oh, we are going to talk about ways to keep journals; in the weeks and months to come, we are going to talk about it a lot: about paper and laying out a page and formatting and lettering and you name it, but today, there is no so-called best way. What matters is that you clicked on this link because you want to keep a journal or diary – maybe just with words but maybe also with drawings or doodling or gluing or something. And you don’t know how to start.

It is possible you are an experienced journal keeper and do not need outside help. I think it is more likely that you are new at this or that you began and are now stuck. Maybe you bought a blank book and have never made a mark in it because it’s too good to write in. Maybe you have a plain-old, lined notebook that cost $1.29 and you think it’s not good enough.

Whichever it is, you are mistaken. What you need to start your journal is this: something to write on (handmade [read more]

Using Ink in Your Journal Work

So, let’s talk about ink. It is one of the bedrock materials for use in an illustrated journal, sketchbook, art journal, junk journal, or an array of mixed-media projects. There is fountain pen ink, plant based inks, pigments, dyes, acrylic ink, and tinctures and they can all be used to create backgrounds or highlights or washes or shadows in your sketches. Here are ten ways that you can use ink in your journal work. (Go all the way down to see the video!)

– Blots. Doesn’t get simpler than this. Dribble a bit of ink on a page then blot with another sheet then allow to dry. Depending on how much ink you use, you will either have a substantial, abstract background to draw or work on top of, or a smaller blotch. The shapes created by these smaller puddles of colour often suggest a drawing with this as its base. You can also make a blot by spraying liberally with a mister than allowing to dry or by folding the pages on top of each other for a dramatic smudge.

– Asemic writing is an abstract calligraphy, scribbled lines that suggest letters and in turn, words. (To see [read more]

Basic Workshop Info

To attend one of these workshops, please contact me and book in for a time that suits you. These are two hour sessions of intense teaching and creating, and that will leave you inspired.


Art Play Date Workshop

Join artist Kelly Boler at her marina art studio for a playdate that includes one-on-one tuition and full use of an amazing variety of stencils, rubber stamps, inks, embossing powders, acrylic paint, pastels, watercolours, gel mediums, gesso, hot glue, paint daubers, watercolour pencils and crayons, die cutters, washi tape, and a huge assortment of paper ephemera. Also on hand is a library of art books filled with ideas for inspiration. Learn how to keep an art journal, make your own tag art, try out unfamiliar art supplies and techniques, or just play.

This playdate is ideal for absolute beginners as well as experienced crafters. Buy it for yourself or give to someone who might need a nudge with their creativity. Two hours includes use of all supplies and how-tos on a variety of crafts on heavy watercolour paper, or bring your own blank book to get jumpstarted there. £40 for an individual or £75 for two – bring a friend!

To make a date call or [read more]

Plant Dyed Ecoprint Paper with Onion Skins

Over the years I have made some impressive dyed pages (often called ecoprints) with autumn leaves. (To see this tutorial, go here: http://bookandpaperarts.com/bookandpaper/beautiful-paper-dyeing-fall-foliage-leaves-using-eco-printing-techniques/) Recently I tried the same technique with onion skins and wow wow wow, it did not disappoint. Haunting colours, depths, and rust-like patterns, and I don’t have to wait for fall to roll around. Here is a breakdown of how these pages were made. Hopefully you will put it on your list of things to try, and if you have any questions, just get in touch via email or the comments below.

MATERIALS

  • loose onion skins, purple or yellow or both
  • a mordant (optional but I highly suggest it)
  • a deep baking dish large enough for your paper
  • heavy paper – I use 200 gsm
  • twine or cord
  • the biggest darn pot you can find – I use a stock pot
  • sticks or dowels (optional but helpful)

DIRECTIONS

Okay, how do you gather up a mess of onion skins in the first place? In order to procure a substantial supply you have to be resourceful. My system is to go to the loose onions in the supermarket and when no one is looking, rustle them a bit. The skins loosen and [read more]

Distressing Paper with Tea and Coffee

Sometimes you have to spend good money for art supplies and sometimes – you don’t. For instance, you can get a lot of beautiful, mysterious, and dramatic effects with leftover tea and coffee for free.

  • Tea stained pages. Simply soak pages in strong tea (I use double the tea bags for a heavy brew) for a few minutes for a pale shade or overnight for a deeper patina. If you rotate the pages while still damp, the tea will travel over the paper and then pool in different parts so that the staining is irregular. This can also be done with coffee.
  • I prefer to get a light, parchment colour with tea and then use coffee for mark-making. While you can use it straight out of the pot, I always take the day’s leftovers and leave them in an open container overnight. The water evaporates a little making an even stronger brew. (I actually let my coffee evaporate for several days. It is not always intentional – I just get behind on stuff and it sits there waiting for me, getting darker and darker.) You can also use instant coffee and make it even stronger.

Tea Bag Art Tips

Boy do I love using old tea bags in art. There is something mysterious about the translucent layers they make. Added to paper or other substrate, they look like parchment or linen, while allowing any text or image underneath to show through. Here are some suggestions for using tea bags in your art, collage, scrapbook, or other mixed media projects.

Layering, layering, layering. Brush your glue medium of choice onto the tea bag and place it on the surface you are working with. Bunch it up here and there for added texture. You can then paint or print over that. Or not.

Rubber stamps. You can get some dramatic effects that look like a tiny print on parchment that you then add to paper or board.

– Guess what doesn’t work. Stencils with ink from a spritzer or mister. What does work are stencils with ink pad. For this I used a Tim Holtz blending tool that you “load” with ink from a pad, then pounce over the stencil.

Paint. I am not much of a painter but there are artists out there who turned the humble tea bag into a tiny canvas for portraits. Here I have used acrylics, both [read more]

Paper Art: Faux-Dyed Paper and “Mark Making”

I am deeply attracted to rust-dyed papers and enjoying reading about the technique. It usually seems to involve different combinations of tea, rusty stuff, paper bundles, and a cauldron, and I don’t have room for anything remotely that big, even in my studio, which is a scant 98 square feet and filled to the rafters with ephemera and tea cups. Recently, however, I found a method of dying papers that, while it lacks the eerie depth of mark-making with rust, it is pretty darn lovely; also simple and quick, which makes for near-instant gratification.

MATERIALS:

Ink (I use a variety of fountain pen inks and homemade walnut ink)

Medium to heavy weight paper or cardstock

Small sponge

A water mister

Ink, Sponge, and Mister

These pages are to be used for a sketchbook. Rather than cut them to size, I tore them, using a ruler as a straightedge. This torn edge is pretty as it mimics a deckled edge, and it absorbs the ink.

Tearing the Edges of Paper

Dip the sponge in the undiluted ink, then dab the edges of the page around all sides.

Now spray the page with the water using your mister/spritzer. Start with the edges, turning the page as you mist. When you [read more]

Paste Paper Tutorial – Decorate Your Pages

One of the most beautiful and accessible techniques for decorating pages is with paste paper. For centuries it has been used for endpapers, bookbinding, wallpaper, and other crafts. In the 17th century it was widely used by unmarried Moravian women as a way of supporting themselves at home; their work made its way all over Europe.

Recipes vary, but this is one I have used for years. The alum is a mordant, which helps the color “grab” the paper. (For my U.K. friends, alum can be bought online.)

  • ½ cup white flour (cake flour is best but if you don’t have it, don’t sweat it)
  • ½ cup corn starch/corn flour
  • 1 tablespoon alum
  • 1 cup + 1 cup cold water
  • 4 cups boiling water

Basically you are creating a homemade paste. Mix flour, corn starch, and alum thoroughly. Add one cup cold water and whisk. Add four cups boiling water and keep stirring with whisk. Place over high heat on stovetop and keep stirring. As mixture thickens, turn the temperature down and let it simmer. It is important to keep stirring constantly for an even texture. I let it cook for about 15 minutes. The mixture will become somewhat translucent and pudding like.

Take off [read more]

Traveling with Your Art Journal Supplies

The first, best piece of advice I ever received about keeping an illustrated or sketchbook journal was to always, always travel with your supplies and be prepared. I take mine everywhere: walks, restaurants, museums, doctor’s offices, even church – a great place for meditative drawing. If you carry what you need with you along with your sketchbook, you will always be ready to draw at a moment’s notice, no excuses and more importantly, be ready to use small amounts of time where you might ordinarily be staring into space (traffic jams, airplanes, etc.)

If you have never kept a portable studio like this before, don’t worry. Everyone is going to work with different materials to suit their own style and needs, and you may not know what these are until you have tried it for awhile. Also, buying all new supplies can be expensive, although it is perfectly possible to keep a visual diary with little more than a good pen and a glue stick. Just get what you can and add to it when you can. For instance, I couldn’t really afford a whole set of good water color crayons in one go, so I buy one or two whenever [read more]

Older posts Newer posts