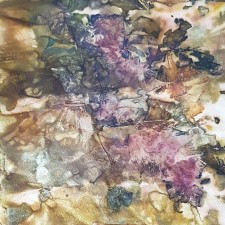
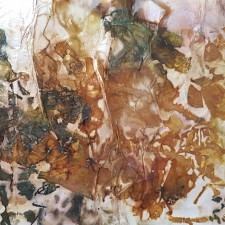
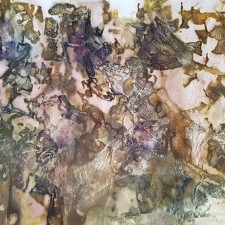
Over the years I have made some impressive dyed pages (often called ecoprints) with autumn leaves. (To see this tutorial, go here: https://bookandpaperarts.com/bookandpaper/beautiful-paper-dyeing-fall-foliage-leaves-using-eco-printing-techniques/) Recently I tried the same technique with onion skins and wow wow wow, it did not disappoint. Haunting colours, depths, and rust-like patterns, and I don’t have to wait for fall to roll around. Here is a breakdown of how these pages were made. Hopefully you will put it on your list of things to try, and if you have any questions, just get in touch via email or the comments below.

MATERIALS
- loose onion skins, purple or yellow or both
- a mordant (optional but I highly suggest it)
- a deep baking dish large enough for your paper
- heavy paper – I use 200 gsm
- twine or cord
- the biggest darn pot you can find – I use a stock pot
- sticks or dowels (optional but helpful)
DIRECTIONS
Okay, how do you gather up a mess of onion skins in the first place? In order to procure a substantial supply you have to be resourceful. My system is to go to the loose onions in the supermarket and when no one is looking, rustle them a bit. The skins loosen and they come off easily. (And a good thing, too, because you don’t actually want to handle the onions closely. The shop and other customers might not thank you if you did.) Root around under the onions: a lot of skins will be in the bottom of the bin. It usually takes me two or three trips to the store to get enough to work with, so plan ahead. You can also try a local café, farmers market, or food coop and ask them to save them for you.

Choose the right paper. I have had consistent good luck with 200 gsm (90 lbs). If it is much lighter, the paper may tear mid-process. While I currently use a high quality, artist paper, in the past I have used whatever I had that was in my budget so don’t overthink it. Ecoprinting is often done on fabric such as linen, silk, or wool, but I haven’t tried that yet.
Soak the papers overnight in a deep dish, such as a casserole dish. If you can, add a mordant to the water. A mordant is a substance that causes the paper to really grab the colour. While you can skip this, the effects will be less dramatic. I use alum although it is also possible to make a mordant from rust or vinegar. When you put the pages in the water, be sure and move each one about before adding the next to make sure that the page is fully covered and not “masked” by the next page.
The next morning, pull out a sheet and spread a bunch of onion skins over the page.

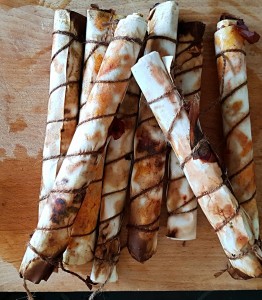
How much? It is an individual taste. I recommend a lot but I have had some good results with thinner cover. It is important to make sure you spread them evenly from edge to edge. Then take a stick or dowel (careful it is not taller than your stock pot) on one end and start to roll the paper around it, as if you were making a scroll or sushi or a sandwich wrap or cinnamon roll. Try to get the tightest roll you can but don’t agonize over it. Press down firmly as you roll so that the skins are held in place. If you using sticks, be careful of twiggy bumps that may put holes in the wet (and fragile) paper. In a pinch, I have rolled without a stick for an anchor and it has been okay. Just start the roll off and pull the paper into the centre as you go. Bind your rolled bundle with twine. If you want you can use a lot, as the cord makes a kind of resist against the colour and becomes part of the pattern. (I’m too lazy.)

Put about an inch or less of water in the stock pot. You want to steam your papers rather than boil them. I add a few tea bags into the water to add a little patina, but it is not necessary. If you have a veggie steamer or other element that lets you place your bundles above the water, you can use it, but I am happy with the ends sticking into the water: it makes life easier and since the end effect is mottled and variable, it doesn’t matter much, although I do turn the sticks over midway to get a more even distribution of this effect. Steam for at least two hours. Three is better. Make sure that you have a tight cover. I usually find that my bundles are slightly taller than my stock pot, so I make a “lid” out of foil. Don’t forget to add water to the pot from time to time. When you have finished steaming, leave them in the pot for another hour or two, then remove and while still in bundles, allow to dry, either in the sun, a low oven, or just overnight. RESIST THE URGE TO UNDO YOUR BUNDLES AT THIS POINT. It is hard, I know, but you won’t be sorry.
I felt that this steamed bundle had too much white in it for my personal palette, so I poured the remaining tea water from the stockpot over them for a few minutes then removed to air dry.

When at last the bundles are dry or nearly dry, untie and gently unroll. Compost your onion skins, save your sticks, and prepare to swoon. To get your pages flat, and to finish drying if still damp, press with an iron at a high setting.

Your new pages can be used for so, so many projects. Collage, endpapers, journal work, ATCs, scrapbooks. They can also be bound into a handmade sketchbook or journal. To see an example of handmade book of (similar) rust-dyed papers, see this sumptuous work by Alice Fox:
http://www.alicefox.co.uk/?p=1909
Another page with inspiring examples and helpful instructions is by Wendyfe:
http://wendyfe.wordpress.com/2013/04/06/eco-print-fest/
and of course there is the queen of plant based dyes and ecoprints, India Flint:
 Follow
Leave a Reply